Merge Pages On Facebook Updated 2019
Merge Pages On Facebook: If gradually you have actually set-up a variety of Facebook business pages as well as you're aiming to consolidate them, there's a relatively simple way to do it. Nevertheless, it's not a quick procedure. Merging Facebook pages can occupy to a week to be completed. Particularly if both Facebook company pages are dissimilar in motif or sector. We've assembled a detailed overview of get you through what you should do. The adhering to actions can be finished in less than HALF AN HOUR.
-Change the Profile Picture & Header Image
-Update the About Us section.
-Submit a request to change the name of the page you wish to merge.
-Combining Facebook pages.

Note: For this article, we're presuming that the pages are not similar in theme or market (which is more difficult). Nevertheless, the steps still apply if the pages are comparable. The technique below can be used for more than 2 pages, however, you could just merge Facebook page A with Facebook page B. You can't merge several Facebook pages at the same time. Each merge request needs to be completed in full as well as submitted independently.
Merge Pages On Facebook
1. Change the Profile Picture & Header Picture
The first thing to do is to ensure that each of your Facebook organisation pages has the same account image and header picture. Inevitably, you will be deleting one of them, so it's important to make certain that when Facebook receive the merge request that the pages are comparable in regards to what they have to do with.
Open up both of your pages as well as review the photos.

Download the profile image as well as header picture from page An and upload them right into page B.

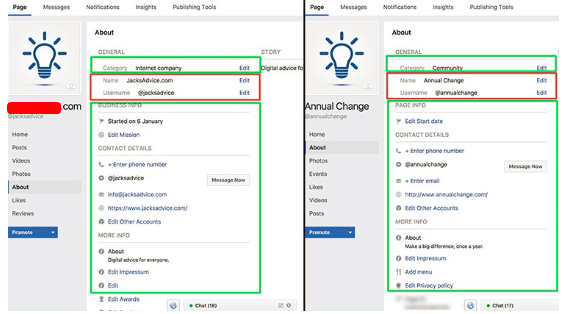
2. Change the About Us Area
Now that the photos remain in area, you should alter the "About Us" area to ensure that the information is specifically the same on both pages. This is a case of just duplicating and pasting the information from one page to the following. See to it that you consist of all details and fill in all fields that are inhabited. Don't change the Name or User Name yet (red boxes). That's finished after the remainder of the details is updated.
3. Change the Name of the page You Want To merge
Now that you have all of the details as well as pictures specifically the same as the page you want to keep, it's time to experience a Change Name request with Facebook. Click "Edit" beside "Name" in the About Us section. Copy the name from the page you wish to keep exactly and after that include a "2" after it. e.g. mergepage.com & mergepage.com 2.

Click "Continue" and then on the adhering to screen verify the request by clicking "request Change". Facebook state that this can take up to 3 days, yet I have actually located that it's typically finished within a number of hrs.
Keep in mind: When the Change Name request has actually been accepted, you'll now need to wait 7 days to send a Merge Facebook page request. If you aim to send it prior to after that, Facebook will deny it.
4. Send a Merge Facebook page request
This is a very straightforward process to comply with when the 7 days have actually elapsed from the name Change approval.
- Go to Settings at the top of your page.
- Click "General".
- Scroll to "merge Pages".
- Click on "Merge Duplicate page".
- Enter your Facebook password if triggered to do so.
- Select the two Facebook pages to merge.
- Click continue.
- Choose the page that you want to maintain.
- Confirm.

When the request is sent, it will certainly be evaluated by hand by Facebook to ensure that the details on both pages match as described above and that there are no discrepancies. If all the information are appropriate, it should take not than a few hrs for the request to be authorized and also the pages to be merged.
Keep in mind: You will certainly lose all posts, comments as well as interaction from the page you are combining. Nonetheless, you will certainly maintain the web content on the initial page you are maintaining.
-Change the Profile Picture & Header Image
-Update the About Us section.
-Submit a request to change the name of the page you wish to merge.
-Combining Facebook pages.
Note: For this article, we're presuming that the pages are not similar in theme or market (which is more difficult). Nevertheless, the steps still apply if the pages are comparable. The technique below can be used for more than 2 pages, however, you could just merge Facebook page A with Facebook page B. You can't merge several Facebook pages at the same time. Each merge request needs to be completed in full as well as submitted independently.
Merge Pages On Facebook
1. Change the Profile Picture & Header Picture
The first thing to do is to ensure that each of your Facebook organisation pages has the same account image and header picture. Inevitably, you will be deleting one of them, so it's important to make certain that when Facebook receive the merge request that the pages are comparable in regards to what they have to do with.
Open up both of your pages as well as review the photos.
Download the profile image as well as header picture from page An and upload them right into page B.
2. Change the About Us Area
Now that the photos remain in area, you should alter the "About Us" area to ensure that the information is specifically the same on both pages. This is a case of just duplicating and pasting the information from one page to the following. See to it that you consist of all details and fill in all fields that are inhabited. Don't change the Name or User Name yet (red boxes). That's finished after the remainder of the details is updated.
3. Change the Name of the page You Want To merge
Now that you have all of the details as well as pictures specifically the same as the page you want to keep, it's time to experience a Change Name request with Facebook. Click "Edit" beside "Name" in the About Us section. Copy the name from the page you wish to keep exactly and after that include a "2" after it. e.g. mergepage.com & mergepage.com 2.
Click "Continue" and then on the adhering to screen verify the request by clicking "request Change". Facebook state that this can take up to 3 days, yet I have actually located that it's typically finished within a number of hrs.
Keep in mind: When the Change Name request has actually been accepted, you'll now need to wait 7 days to send a Merge Facebook page request. If you aim to send it prior to after that, Facebook will deny it.
4. Send a Merge Facebook page request
This is a very straightforward process to comply with when the 7 days have actually elapsed from the name Change approval.
- Go to Settings at the top of your page.
- Click "General".
- Scroll to "merge Pages".
- Click on "Merge Duplicate page".
- Enter your Facebook password if triggered to do so.
- Select the two Facebook pages to merge.
- Click continue.
- Choose the page that you want to maintain.
- Confirm.
When the request is sent, it will certainly be evaluated by hand by Facebook to ensure that the details on both pages match as described above and that there are no discrepancies. If all the information are appropriate, it should take not than a few hrs for the request to be authorized and also the pages to be merged.
Keep in mind: You will certainly lose all posts, comments as well as interaction from the page you are combining. Nonetheless, you will certainly maintain the web content on the initial page you are maintaining.